GitHub Repository: github.com/openxc/openxc-vehicle-simulator
The OpenXC Vehicle Simulator is a web application intended for developers to run on local machines to generate a simulated OpenXC vehicle data trace in real time, to be used for testing Android applications.
This is intended to complement the Enabler’s ability to play back a recorded trace file. The Simulator does not attempt to provide a high precision depiction of a specific vehicle. If an app requires a high degree of accuracy, debuging should be done with a trace. The Simulator provides real-time manipulation of the data. This allows the developer to create and change desired conditions in real time.
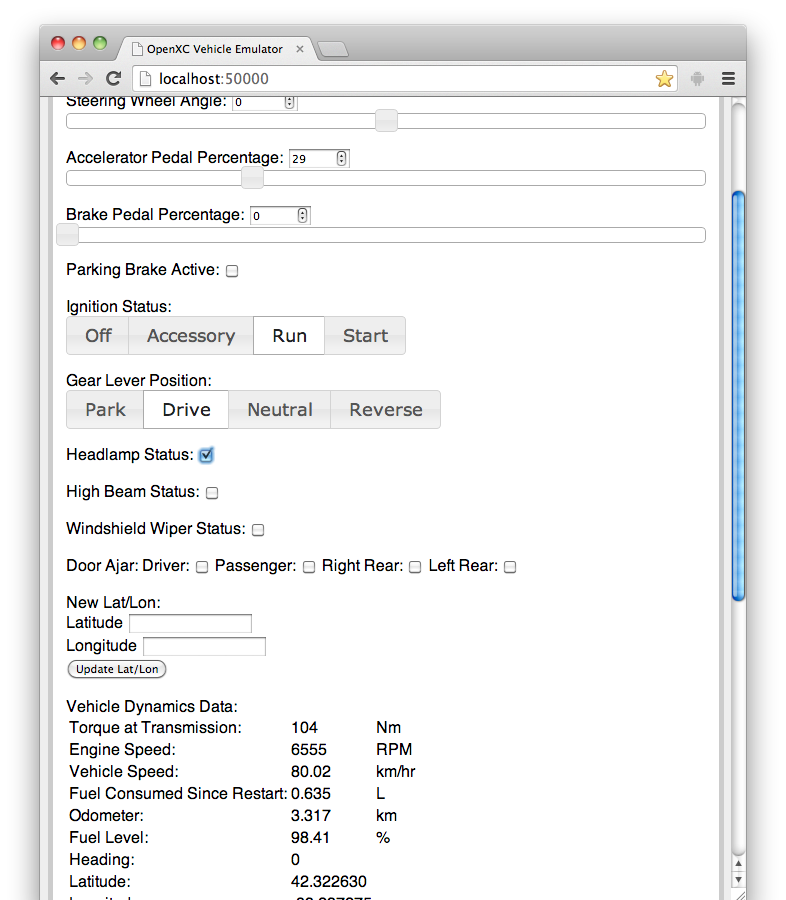
The OpenXC Simulator creates vehicle data in the OpenXC format, simulating data that comes from the OpenXC Vehicle Interface. It simulates all of the signals in the official OpenXC signal list, at the listed frequencies. The simulator also takes user input for the vehicle controls. (Pedals, steering wheel, etc.) The generated data is displayed for the user and sent to the Android host device via TCP connection. The vehicle dynamics model is simple. It is modular, allowing for different vehicles, but for the current version, accuracy is not be a priority. The point is not to create data from a specific model and year, but rather to create plausible data from a hypothetical car that can be used for debugging and demonstrations.
The user interface is not a driving simulator, merely a list of controls. Controls include sliders for pedals and the steering wheel, various radio buttons and switches for other controls, etc. Vehicle controls include everything needed to generate the above list of vehicle data, including doors and lights. While the fastest OpenXC signal is 60Hz, the physics model iterates at 100Hz to produce plausible data for things like the torque and engine speed. The world outside the car is currently assumed to be a flat, featureless sphere, solely for the purpose of generating GPS data.
The core of the simulator is python running a local web server through Flask. The user interface is accessed through a web browser pointed at localhost. The Simulator also listens for incoming network connections from the OpenXC Enabler, running on an Android device.
Once you’ve cloned the repository, install the Python Flask dependencies with
pip:
$ pip install -r pip-requirements.txt
If that fails due to lack of permissions, there are a few options. One is to use VirtualEnv as described in the Flask installation documentation. Another option is to run the install with sudo:
$ sudo pip install -r pip-requirements.txt
To run the app:
$ ./simulator.py
To open the UI, open a browser and navigate to http://localhost:50000/
To connect with an Android device, open the Enabler activity, open the settings, choose Data Sources, and enable “Use a network device”.
Set the host address to the address of the machine running simulator.py, and set the port to 50001. You may need to disable and re-enable “Use a network device” after entering the correct information. The terminal running simulator.py should indicate that it received a new connection.
If the Enabler fails to connect, you may need to use a different IP address. The python address detection isn’t perfect, and multiple IPs on a computer can confuse it. When simulator.py is started, it displays a list of IPs on which it listens for connections from the OpenXC Enabler.
The Simulator is comprised of three main components: The State Manager, The User Interface, and the Dynamics Model. The Network Connection to the OpenXC Enabler makes use of the OpenXC Web API.
The GUI allows real time user input. (pedals, gear, steering wheel, etc.) The GUI also displays the outgoing data to the user. This is not intended to be any sort of video game, nor a simulation of the driving experience. It is only intended to simulate the data that might be generated on the CAN bus. The user interface uses Flask and jQuery to provide interaction with the Simulator.
simulator.py
This is the Python script that sets everything in motion. It starts the Flask server, creates the State Manager object, provides data to the UI, and handles user input.
templates/layout.html
templates/vehicle_controls.html
These provide the html code for the user interface. They provide the framework in which the jQuery components work.
static/emulator_scripts.js
This has all the JavaScript code for the UI. The majority of this file is code handling the jQuery elemenents. It also contains the loop that polls the Dynamics Model for data every second, and displays it.
The Stage Manager keeps track of the simulation’s current state, and handles sending that information to the TCP connection, the GUI, and the Dynamics Model. The State Manager does not regulate data internal to the Dynamics Model. (Air drag, road friction, etc.) Nor will it be updated as fast.
state_manager.py
The State Manager object receives incoming user input, monitors the dynamics model, and sends data to any connected Enablers. It creates and stores the Dynamics Model object and Enabler Connection object. It creates and maintains the loops that send the regular data to the Enabler.
enabler_connection.py
The Enabler Connection object runs a loop that listens for incoming connections from Android devices running the OpenXC Enabler. It also provides the routines for moving data from the State Manager to the Enablers.
The Dynamics Model iterates at 100Hz. Data is kept in the Physics Model with a higher precision than is used in the CAN traffic. (This will help reproduce conditions that have created failures in vehicles, but did not fail with the previous hardware emulator.)
dynamics_model.py
This object initializes all the simulation data, and maintains the current state. The 100HZ iterate loop calls the Iterate() functions for each of the data points.
data/data_calc.py
This is the base class for each of the data types in the Dynamics Model. Each data type in that directory overloads the iterate() function with the proper way to reach the next snapshot of that data.
Copyright (c) 2011-2013 Ford Motor Company
Licensed under the BSD license.