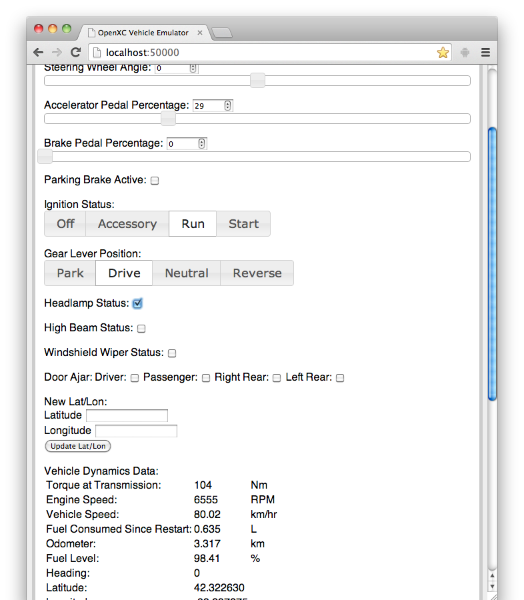
The OpenXC Vehicle Simulator is a web application intended for developers to run on local machines to generate a simulated OpenXC vehicle data trace in real time, to be used for testing Android applications.
Besides unit tests, the simulator is the recommended first step for testing your application.
The library ships with a method for playing back previously recorded vehicle measurement trace files for testing. The Measurement objects received by your application are identical to those received from a live vehicle. The vehicle simulator is generally a more flexible and easy to use option, but if you have a specific driving scenario you wish to repeat multiple times, a trace file is bets.
The trace file format is simply a plain text file of OpenXC JSON messages with an additional timestamp field, separated by newlines:
{"timestamp": 1351176963.426318, "name": "door_status", "value": "passenger", "event": true}
{"timestamp": 1351176963.438087, "name": "fine_odometer_since_restart", "value": 0.0}
{"timestamp": 1351176963.438211, "name": "brake_pedal_status", "value": false}
{"timestamp": 1351176963.438318, "name": "transmission_gear_position", "value": "second"}
In fact, this is the same method used by some of the instrumentation tests. Once you’ve created a file either by recording the output of the vehicle interface module or building one by hand, copy it to your Android device’s internal storage or SD card. You can do this in one of three ways:
abd on the command line:
$ adb push driving.json /sdcard/openxc-driving.jsonInstall the Enabler app if you haven’t already. That application helps control the source of vehicle data, e.g. a USB vehicle interface or a trace file.
Install a file manager in Android like the OI File Manager so the Enabler is able to browse for files on the SD card.
Finally, run the OpenXC Enabler app on the device and go to Settings -> Data
Sources -> Trace File Playback, check the Playback trace file option and
browse for the trace file you copied over.
There are a number of trace files available.
Unfortunately the Android emulator does not allow us to send arbitrary events from button presses without editing the source. In order to test your button event handlers, the recommended method is to write them in such a way that they can accept either VehicleButtonEvents or regular Android key events as input. You may want a flag to disable the Android key events when running in production.
For example, the OpenXC specification includes a signal for a D-pad style
controller. The 2012 Ford Focus has such a controller on the steering wheel.
The Android emulator will send KEYCODE_DPAD_*
KeyEvents
when you press the arrows on your computer’s num pad. These are a good parallel
and it should be simple to have your event handlers watch for either the
vehicle D-pad event or the Android event.
Here’s an example - if you want your application to send a text message when the user presses the down button on the steering wheel, write a function that performs the action:
public void sendTextMessage() {
    // send a text message
    ...
}
To hook this up to Android KeyEvent, define an onKey method in your
activity:
@Override
public boolean onKeyDown(int i, KeyEvent event) {
    if (i == KeyEvent.KEYCODE_DPAD_DOWN) {
        sendTextMessage();
        return true;
    }
    super.onKeyDown(i, event);
    return true;
}
This connects your functionality to the virtual button in the Android emulator. To have this actually work in the car, you need to register a handler for the VehicleButtonEvent.
VehicleButtonEvent.Listener listener = new VehicleButtonEvent.Listener() {
    public void receive(VehicleMeasurement measurement) {
        final VehicleButtonEvent event (VehicleButtonEvent) measurement;
        if(event.getAction() ==
                    VehicleButtonEvent.ButtonAction.PRESSED,
                && event.getValue() ==
                    VehicleButtonEvent.ButtonId.DOWN) {
            sendTextMessage();
        }
    }
}User interface design for automotive environments is increasingly attracting attention, particularly due to concerns with driver distraction. While building your OpenXC application, keep in mind the U.S. government’s recently released guidelines (PDF) for application design.
Driver distraction aside, the most useful and interesting applications tend to be those without much driver interaction. The more you can automate or let the user deal with outside of their vehicle, the better the experience will likely be.